Thursday, January 13, 2011

Old fashion apple pie

It had been long time since I had made a pie.  Why?  I don't know.  I love making them.  There is some thing so nostalgic about baking a pie.


Not just the memories of childhood that the smell of pie in the oven can conjure, but also a rite of passage.  Does that make sense?  A feeling of connection to the past.  As I baked this pie, I thought of how many women in the past had done just this.  Unlike when I make a plated dessert for a restaurant menu, which I do enjoy, baking a pie makes me feel part of something.   


OK, sorry about getting so touchy-feely about a pie.  Lets move on, shall we.

Of course, every good pie starts with the Pie crust.  Sometime when I see those pie judging contest on TV, and they go on and on about the method used in making the crust, I wonder if I should be more careful in making mine. 

But, so far this method has worked for me. I do think it is very important to use very cold butter.

Basic Flaky Pie Crust 
(From the Pie Bible)


Ingredients:
7 ounces unsalted butter, frozen and cubed
2 1/4 cup all purpose flour
pinch of salt
5 to 7 tablespoons ice water
1 tablespoon cider vinegar


Filling:
2/12 lbs of apples peeled, cored and sliced 1/8 inch thin.
1 tablespoon lemon juice
1/4 cup brown sugar
1/4 cup granulated ugar
1/4 teaspoon nutmeg
1 1/2 teaspoon cinnamon
pinch of salt
1 ounce ofunsalted butter
1 tablespoon + 1 teaspoon cornstarch


Method:
10 min before making the dough, place the cubed butter in the freezer. In the bowl of a food processor, fitted with the blade attachment, place the flour and the salt.  Pulse a couple of times to combine.  Add the butter, 1/2 at a time and pulse until the the mixture resembles course meal.

Now add the vinegar and half the water.  Pulse 5 or 6 times.  Place some of the dough between you fingers,  to see if it comes together.  It it doesn't add the remaining water. Pulse again a couple of times.  Check to see if it comes together.  If it doesn't than add a little more water a teaspoon at a time until it does.  Divide the dough in half and wrap in plastic wrap forming two small disks. Refrigerate for at least 1 hour but over night is better.


Making the pie:


You will need a 9inch pie pan.


Take one of the disks out of the refrigerator and let sit for 10 min. to soften a little for easier rolling.


While the dough is warming, place the apples, lemon juice, sugars, nutmeg, cinnamon and salt in a bowl and toss.  Let sit at room temp. for at least 30 min.. This will allow the apples to release their juice. 


Roll the dough out large enough to cut out a 12 inch circle 1/8 of an inch thick. Transfer to the pie tin. Trim the dough to meet the end of the pie pan. Place back in the refrigerator.


Next place the apples in a colander over a bowl to capture the juices. The apples should release at least a 1/2 cup of juice.  Place the juice in a sauce pan with the butter.


Over medium high heat, boil down this liquid to about 1/3 cup.  If the apples produced more liquid, you will have a litter more.  That's fine.


Now, toss the apples with the cornstarch  until all traces of cornstarch disappear. Add the reduced liquid with the apples. Take out the second disk of dough out and let sit for ten minutes.


Remove the bottom dough out of the refrigerator and place the apples in the pie tin.


Roll out the top dough, egg wash the edge of the bottom dough, place the top dough over the apples, tuck it under the bottom edge and crimp the edges.


Pre-heat your oven to 425 degrees.


Place the pie in the refrigerator for 10 min to rest and chill.  This will help with shrinkage.  


Remove from the refrigerator place on a sheet pan. Egg wash the pie and make slits on the top to release steam.


Place the pie in the oven and bake for 10 minutes.  Reduce the oven temperature to 375 degrees and bake for another 30 minutes. 


If the edges of the pie start to get too dark, cover with tin foil and continue to bake.  


 After the pie has baked, I like to test it by sticking a paring knife through one of the slits to make sure the apples are tender enough for the knife to go through.  But not too soft.


When done, remove from the oven and place on a wire rack to cool.  Resist the temptation to cut right it.  


Now I do not have any photos of it sliced because this was a special order from one of my customers, but according to her,  It was to die for.


Enjoy!

Tuesday, January 11, 2011

Croissants

I know the thought of making croissants may seem daunting, but once you've had them, you will see that they are so worth the effort. 


It always amazes me that you can put 3 to 4 ingredients together and what comes out can be so flaky, buttery, and delicious.  Who was the first person to make a croissant? I don't know, but to that person, "Thank You" from the bottom of my heart, "Thank you"!

I started out just making a dozen or so croissants each week for the market (along with other things), now I make about 8 dozen and sell out every Saturday. that may not seem like a lot for most bakeries, but when you have a little table at a Farmers Market for 4 hours a week, it's pretty good!


Croissant dough is a "Laminated" dough. Which means that it is created by rolling together alternating layers of butter and dough.  These layers are what give puff pastry and croissant doughs their flakiness and crunch.  It's a pastry staple. 


Now this recipe makes between 12 and 14 croissants depending on how you cut them. 


Ingreditnts:
1 cup cold whole milk
1 tablespoon active dry yeast
1 cup all purpose flour
2 cups bread flour
2 teaspoons salt
1 tablespoon sugar
1 pound unsalted butter, roomtemp. 


Method:

Make a base dough.  I the bowl of an electric mixer, place the milk, and yeast, let proof for 5 minutes.  Add the flours, salt, and 1/4 of the butter.  Mix with the dough hook until the dough forms a ball.  Do not mix to much as this might make the dough tough.  Wrap in plastic wrap and place in the refrigerator for at least six hours to over night. 


Form a block with the remaining 3/4 of the butter.(must be softened, but not too soft. you want it to be easy to roll.


Roll a the starter dough into a 6x6 square.


Now, place the butter blocks in the center of the dough.  


(this is a photo of a double recipe)


Now fold the sides of the dough over the butter like an envelope. Dusting the excess flour off.


Now roll the dough into a rectangle (6x18 inch)and fold the ends of the long side into the center. And then fold the sides in again to form a rectangle.


Brush off the excess flour and wrap in plastic wrap.  Place in the refrigerator for 25 min.  The timing on this is very important.  If you leave it too long in the refrigerator, the butter will get too cold to roll.  And if you don't leave it long enough, the dough will be to elastic. 


After 25 minutes, remove from the refrigerator and roll into another triangle. Repeat the fold from above.  Fold each end to the center from the long side and than in half again. Refrigerate  for another 25 minutes.


Remove from refrigerator and repeat the fold one more time.  Wrap well and refrigerate for at least 6 hours.

All this rolling is what gives the dough it's layers. 


Now that you have made the dough, it's time to cut some croissants!


On a lightly floured table, roll the croissant dough into a 20x 18 inch rectangle, 1/4 inch thick. If the dough seems elastic and springs back when you roll it, let it rest 5 minutes. than roll again. 


Using a ruler and a pastry wheel, cut the rectangle in half horizonally, making two smaller rectangles, one on top of the other. 
Using a ruler and a paring knife, make very thin score marks every 5 inches along the top ad bottom edges of the large rectangle.


Using the straight edge of the ruler, connect the bottom left corner of the large rectangle with the first top score mark. Cut a diagonally along this line.  Next, move the straight edge one mark to the right and connect the first bottom score mark to the second top score mark and cut along this line.  Repeat this diagonal cut from the second bottom score mark to the third top and the shird bottom to right top corner.  When complete, you will have 6 perfect parallelograms and 4 partial ones.


Net reverse the diagonal cut pattern from the top left corner to the first bottom score mark. Repeat the lines, moving across from left to right.  This step cut the parallelograms in half, leaving 14 triangles.


CONFUSED YET??? Just look at the pic below.


Now line two baking sheets with parchment.  To form each croissant, take a triangle of the dough and make a short slit in the middle of the short side.  Strech that short side a bit than begin to roll the triangle up toward the point.  Be sure the dip is tucked under.  Place on the prepared pan and repeat.  Leave about 2 inches between each croissant.


If you are making chocolate or almond croissants. Place chocolate or almond paste on the end of the croissant before you start to roll.


Now cover with oiled plastic wrap.  Proof for 1 1/2 hours is fresh or 2 1/2 if out of the refrigerator.   You can also freeze at this point.  And just defrost slowly in the refrigerator when you want to use them.


Toward the end of the proofing time, preheat the oven to 400 degrees.  Brush the croissants with egg wash and bake for 12 minutes or until golden brown and crispy.


ENJOY!

Sunday, January 9, 2011

"Petite" galette des rois

Every year along with the Traditional New Orleans style king cakes I make these beautiful French king cakes, or galettes.  


They are so decadent. Creamy almond filling, sandwiched between two disks of buttery puff pastry.  Hello, does it get much better than that?


Around this time of year, Carnival season, I have a love hate relationship with these.  On one hand they are so beautiful and tasty, and I can count on one hand with, with three fingers, how many bakeries in New Orleans make them. So my customers at the Farmer Market are always so happy to see them on my table.  

And on the other had,  I make my own Puff Pastry so the labor involved is quite time consuming.  But non the less, I am dedicated to making them.


And these little piggies went to the Market.....

Now it is not necessary to make your own puff pastry, I do because I make these to sell, and there really is a big difference between store bought and hand made laminated doughs.  ( I do have plans to post on laminated doughs.)  


But please do not let this stop you from trying these.  They will still be very good.  


Traditionally, the filling consists of almond cream mixed with pastry cream.  In my version, I use only the almond cream.


Almond cream 


(This makes about 3 cups of almond cream.  You can use the extra to fill a tart shell and top with poached pears, fill croissants,or freeze it.)


3 cups sliced, blanched almonds
3 tablespoons all purpose flour
1 1/2  cups softened, unsalted butter
1 1/2  cups granulated sugar
1 tablespoon vanilla
3 tablespoons almond extract


Place the almonds and flour in the bowl of the food processor.  Pulse until it resembles flour.  Add the sugar and the butter.  Mix until combined.  Add the rest of the ingredient and mix until completely combined.  Chill until needed.


Now prepare you puff pastry.  Roll out the puff pastry to 1/8 inch thickness. 
Using a round cookie cutter of your choice, cut out even number of disks.


If you are making large cakes, use a template of you choice.  I used a mixing bowl.

 Place the rounds on a parchment lined sheet pan, cover with plastic wrap and let rest in the refrigerator for at least 20 min.  This will help with shrinkage and will result in a flakier pastry.

Once it is rested, line half of the rounds on a sheet pan. Brush each with egg wash. Using a small scoop, place a ball of almond cream in the center of each round.

 If you are making a large cake, spread an 1/8 inch layer of the almond cream in the center on one round, keeping an one inch border around the perimeter.

Now, top with the other half of the circles.  Pressing around the edges to make sure they are sealed all around.  Refrigerate for another 5 minutes.  


Pre-heat your oven to 400 degrees.


Using a paring knife, mark the tops of the cakes in a pinwheel pattern. Brush the top with egg wash and sprinkle with granulated sugar.


As you can see, I cut a hole in the top of the large one to vent steam.


Now place in the oven and bake for 20 -25 minutes.  Until puffed and golden.  Time may vary with each oven, just keep a close eye on them.


Enjoy!!!

New Orleans style King Cake

Here in New Orleans we too have a the tradition of the "King Cake"  Which was brought to us by colonist from France and Spain.   It takes it's name from the Biblical story of the  "Three Kings" , the Catholics believe that it took the Three Kings 12 days for them to arrive in Bethlehem to honor the birth of the Baby Jesus.  The day known as the Epiphany.

In New Orleans it is the end of the Christmas holiday, but also important, it is the beginning of Carnival Season!  Better known as Mardi Gras!

We celebrate here with the Street car ride of the "Phunny Phorty Phellows"  A riding group that parades down the street car line, dressed in their Mardi Gras costumes throwing beads to by-standers. And everyone buys there first King cake of the season.


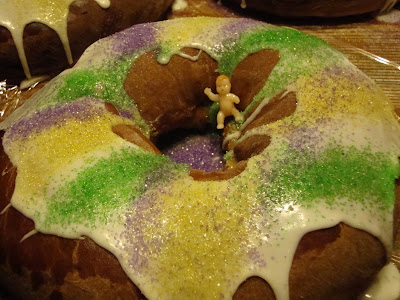
So, as you can see, our King Cake are nothing like the French "Galette des rosi"  The traditional New Orleans style king cake is more like a large cinnamon roll that is rolled up into a ring, sometimes braided.  It is then finished off with some icing and sprinkled with colored sugar, purple, green and gold to be exact.


Purple, green and gold are the colors of Mardi Gras.  One belief is that they represent justice, peace and Power.  Another is in keeping with the history of the the three kings. The three kings brought gifts of Frankincense, Gold, and Myrrh. 

So purple is representative of Myrrh, which is a reddish brown (purple) resin from the Commiphora tree. 
Green is representative of Frankincense which is a light green resin from the Boswellia tree.
Gold is for gold.

We place a plastic baby in the cake, and the person who gets the piece with the baby (baby Jesus) is the King or Queen of the party and has to bring the a King Cake to the next party or gathering.

Now that you know the history of the King cake, as much as I know about it, lets make one!


To Start, we need to make brioche dough.


(Yeilds 3 medium cakes)
Ingredients:
1 cup of slightly warm milk
1/2 cup of sugar
5 teaspoons of dry active yeast
8 whole eggs
6 cups bread flour
2 teaspoons salt
1 pound unsalted butter, room temp, cubed


Method:
Place the milk, sugar, and yeast in the bowl of an electric mixer.  Stir and let proof. About 5 min.  Add the eggs, bread flour and salt.  With the dough hook, kneed for 5 min on medium speed.  Next add the butter, a little at a time, and mix until it is incorporated.  Scrapping every so often.  Place the finished dough in to a container at least twice the size of the dough, cover with lid or plastic wrap.  Let it sit in the refrigerator over night.  Or at least 8 hours.


Once the dough is chilled, turn it out on to a floured surface. Divide the dough into three equal parts.  just a note, if you do not want to make three king cakes, you can freeze the rest of the dough or bake it off and make rolls or brioche loafs.


Roll each piece in to a rectangle, about 12x6 inches.


Egg wash the top, sprinkle with about 1/2 cup brown sugar,and than sprinkle the  whole surface with cinnamon, and dot with 3 ounces of butter.


Now roll up into a long. (does it seem like your making cinnamon rolls? :))


Now, shape the log into a ring. Place on a parchment lined sheet pan, brush with egg wash, and lightly cover with plastic.


Let prof until doubled.  Preheat your oven to 350 degrees. 
Bake the finished cakes for 25 to 30 minutes.  


Remove from the oven and let cool completely.


 Once the cakes have cooled.  Glaze them with a mixture of  powder sugar and half and half.  You want the glaze consistency of honey. You want it to be thin enough to run down the sides but thick enough to stick to the cake.


And sprinkle with purple, green, and gold colored sugar.


Enjoy!

Monday, January 3, 2011

Gateau Saint-Honore


This classic French Cake is named after Saint Honorius, the Bishop of Amiens in the sixth century, and the French Patron Saint of Pastry Cooks.

Gateau Saint-Honore is one of those classic deserts that when you eat it you say to yourself, "Now that's perfection".  There are a few things that I make that really make me feel like I have made something special, a beautiful pie, an airy, chewy, loaf of bread and now this.

You use a lot of the basic skills that every pastry chef must master.  The three "P's"...Puff Pastry, Pate a Choux, and Pastry cream.  And this is a cake that must be eaten the day it is made or the puff pastry and the pate a choux will get soggy.

Don't be put off by the amount of steps.  It really is worth it.  And talk about a crowd pleaser! 


So here we go...

(this makes two, but you can half the recipe, or you can make two and give one to a friend)


Pastry Cream:
(I would make this a day in advance, because it must be completely chilled and set before making the Bavarian Cream.)

Ingredients:
1 cup whole milk
1/4 cup sugar
1/4 vanilla bean, split lengthwise, seeds scraped or 1/4 teaspoon good vanilla extract
2 egg yolks
1/8 cup cornstarch
1 tablespoon unsalted butter, cut into small pieces

In a medium saucepan, combine the milk, half of the sugar, vanilla, and salt.  Cook over medium heat until mixture comes to a simmer.

In a medium bowl, whisk together the egg yolks, cornstarch, and remaining sugar, until pale.  Whisking constantly slowly pour about 1/2 cup of the hot milk mixture into the egg yolk mixture, continue to add a little at a time until it has been incorporated.  Pour mixture back into the saucepan, and cook over medium high heat, whisking constantly, until it thickens and registers 160 degrees on an instant read thermometer, about 2 minutes,  Remove from heat, discard the vanilla bean if used.

Transfer to a bowl and mix in the butter.  Cover with plastic wrap, pressing it directly onto the surface of the pastry cream to prevent a skin from forming.  Refrigerate until chilled, at least 2 hours or up to 2 days.

Puff pastry:

I made my own, but you can use store bought.  Roll two 12inch rounds out of the puff pastry about 1/8 inch thick.  Place on a sheet pan on parchment cover and put in the refrigerator to chill and rest.  

While the puff is resting, make your Pate a choux.

Ingredients:

1 stick unsalted butter, cut into pieces
1 tablespoon sugar
1 cup water
1/2 teaspoon salt
1 1/4 cups all-purpose flour
4 large eggs 

In a medium sauce pan place the butter, water, salt and sugar. bring to a boil over medium high heat, and immediately remove from the heat.  Using a wooden spoon and quickly stir in the flour until combined.  Return the pan to the heat and cook. stirring constantly, until the mixture pulls away from the sides and a film forms on the bottom of the pan, about 3 minutes.

Transfer mixture to the bowl of an electric mixer fitted with the paddle attachment.  Mix on low speed until slightly cooled, about 1 minute.  Increase the speed to medium and add the eggs, one at a time, beating until each is incorporated before adding the next. Test the batter by touching it with your finger and lifting to form a soft peak.  If a soft peak does not form, the batter needs more egg.  If you have added all the eggs add a fifth egg.  Place in a pastry bag with a medium sized plain tip.


Pull the puff pastry rounds out of the fridge. Pipe four concentric rings of Pate a Choux on the circles. Do not pipe them too thick, you will be surprised how much the Pate a choux will puff.  Pipe 16 Pate a Choux profiterole the size of  Bing cherries onto a parchment lined sheet pan.
Bake the Puff Pastry circles and the profiteroles at 400 degrees until the Pate a Choux has puffed, about 10 minutes.  Reduce the heat to 375 degrees and bake until everything is dry enough to hold it shape.  about 35 minutes longer for the cake and about 10 minutes for the profiteroles.


Bavarian Rum Cream:

Ingredients:
4 teaspoons unflavored gelatin powder
1/3 cup light rum
2 cups heavy cream
2 teaspoons vanilla extract
The pastry cream from above
Italian Meringue (below)

Italian Meringue

Ingredients:
1 cup egg whites
6 oz granulated sugar
1/4 cup light corn syrup
1/4 cup water

Place the egg whites in a mixing bowl so you will be ready to start whipping them when the sugar syrup is ready.

Boil the sugar, corn syrup and water.  When the syrup reaches 230 degrees, start whipping the egg whites on high speed. Continue boiling the syrup until it reaches 240 degrees. Soft ball stage.  

Remove the syrup from the heat and lower the mixer speed to medium.  Pour the syrup into the egg whites in a thin, steady stream between the whip and the side of the bowl.  Turn the mixer back to high speed and continue to whip the meringue until it has cooled completely and has formed stiff peaks.

Sprinkle the gelatin powder over the rum.  Set aside to soften.  Whip the heavy cream and the vanilla to stiff peaks. Fold the hipped cream into the Pastry Cream. 


Next fold in the Italian Meringue.

Try to keep as much air in the mixture as possible. 

Place the softened gelatin mixture over a bain-marie and heat to dissolve.  Do not overheat.  Place one-third of the cream mixture in a separate bowl and rapidly stir in the dissolved gelatin.  Still working quickly, mix this into the reamaining cream mixture.

Now place some of the Bavarian rum cream into a pastry bag fitted with a plain tip.  Use the pastry bag tip or the tip of a paring knife to make a small hole in the bottom of each profiterole.  Pipe the cream into the profiteroles to fill them.  Refrigerate the filled profiteroles.

Divide the remaining filling evenly between the two cake spreading it into a dome shape.  Refrigerate the cakes for at least 2 hours to set the cream.

Caramelize one cup of sugar in a heavy bottom sauce pan.  This just means to heat it until it is a nice amber color.  Adding a couple drops of lemon juice to the sugar before heating it helps to keep it from crystallizing. 

Dip the filled profiteroles into the hot caramel, using two forks to avoid burning your fingers.  Place them on a  sheet pan.  The caramel must be hot enough to go on in a thin layer.  Reheat if necessary as you are dipping, stirring constantly to avoid darkening the caramel any more than necessary.  Also avoid getting any of the Bavarian Cream mixed in with the caramel while dipping as the cream can cause the sugare to recrystallize.

OK, lets put this thing together!  

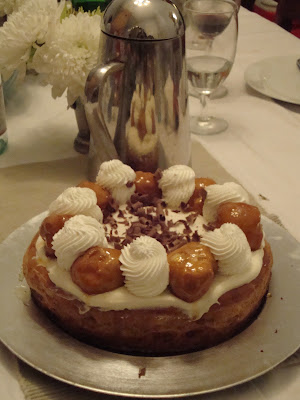
Whip 1 cup heavy cream and 1/4 cup powder sugar to stiff peaks.  Place the whipped cram in a pastry bag with a lager star tip.  Place the cooled profiteroles evenly spaced around the top edge of the cake.  Pipe the whip cream in between the profiteroles.  It looks best if the are about the same size. Using a peeler, shave chocolate over the center of the cakes.

Now all that is left is to wow your guest!


Enjoy!


Monday, December 20, 2010

Bagels, Bagels, Bagels!


If you are a fan of Bagels, and don't live in a town that is known for them, than you need to try and make your own.  There is nothing better than a bagel that is crunchy on the outside and chewy on the inside.

Making bagels is so easy and the results are delicious.

This recipe makes 16 bagels which you may think is too many, but you can share with friends or put in the freezer for later. They freeze great.

So pull out you Mixer and lets get started.

For the dough:

3 1/3 cup lukewarm water
2 Tablespoons sugar
2 Tablespoons Malt Syrup. (if you can not find you can sub sugar)
1 1/2 teaspoons dry active yeast
9 cups bread flour
1 Tablespoon salt


Method:


In the bowl of an electric mixer, place the water, sugar, malt syrup, and yeast.
Proof the yeast, it should take about 5 minutes for the yeast to start to bubble.  


Add the flour first than the salt.  You just want to keep the salt from coming in touch with the yeast. 

With a dough hook mix on low speed to incorporate and than beat on medium high speed for about 3 minutes.  the dough should form a smooth ball.

Place in a oiled container with a lid and let rise until double. 


Turn the dough out onto a floured surface.  With a bench scraper or a knife, divide the dough into 16 equal pieces.  (don't worry if they are not all the same, they are home made)


Form balls with the dough and place on a floured surface covered in plastic wrap to rise.  Let rest until double in size.


Now to shape the bagels:


Line 4 sheet pans with non stick paper and lightly oil.

Take a ball of dough in your hands, with your thumbs and pointer fingers work a hole in the center of the ball. And stretch.   Place the dough on the prepared sheet trays.


Again, cover with plastic wrap and let rest and rise for about ten minutes.


Now to cook the bagels:

Preheat your oven to 400 degrees. First you boil the bagels, this gives them their texture. Place the bagels in simmering water for 3 minutes on each side.  Return the poached bagels to the oiled sheet trays.


Now to season,  You could just egg wash ( 1 egg plus 1 Tablespoon water) the bagels and bake or you can egg wash and add your favorite bagel topping. Sesame seeds, poppy seeds, onion, garlic, salt.  What ever you like.


Bake the bagels for 10 to 15 minutes depending on your oven.  Bake them until they are golden brown.  let cool for 5 or 10 minutes if you can keep your self from digging into one.  


Now enjoy!